2012
May this be a good year for us all!
 |
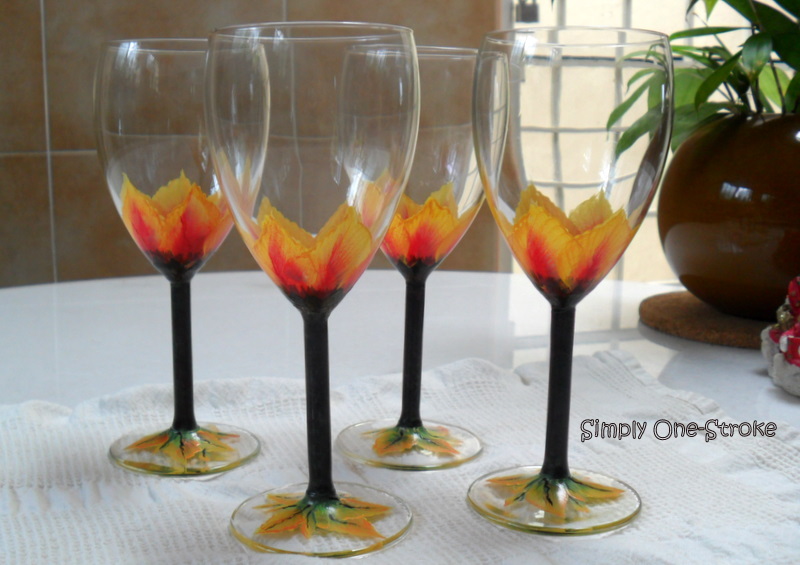
| The long stems are green: with black, and touches of red - to reflect the colours in the petals. |
 |
| I thought a nice dramatic black centre would be just right. And, when you finish your wine, a bloom will be staring right back at you. |
 |
| I signed them all, on the reverse of the bottom - there, but not in-your-face ;) |
 |
| Where's the wine, already?! |

 |
| Isn't this the cutest snowman ever? Hahahah. My daughter gave him to me, for Christmas years ago. I painted that poinsettia, and the paint isn't quite dry, as can be seen. I just free-handed the outline in gold, and when it was dry, I filled in the red, and then the green. |
 |
| Another side of the same fabric box (from Ikea), with holly, this time. |
 |
| This is the one-stop-centre at my home: everything gets chucked here: handbags, car keys, money, sunglasses, everything!!! It has a life of its own, and will be weighed down with stuff, and beg to be cleared. Let's see how long it stays this way . . . . |
 |
| I love these big, red balls! I've also got a couple of green ones, here, but they hiding ;) |
 |
| This wooden soldier is my mum's, and he stood sentry at her place, until she moved in with me a few years ago. He says he's happy to stand guard near my radio, cd player, and never-used-tv! |
 |
| SO: the 'real' reason I was so enthusiastic about painting Christmas-y stuff, was to finish up my gold-glitter paint. Even after all the projects I'd thought of, I still had some left in the bottle. I found this box (Ikea again, how ever did you guess?!!!), and decided to free-hand this design until I was down to the last drop :) |
 |
| It now will sit pretty on the table int my reading corner - just inside the door, next to me rocking chair! |
 |
| This was the first project I did, actually: the placemats, for Chuan and me. I free-handed the outlines, and then decided that I would only fill in the green and the red. Otherwise, it would be overkill, I think. See those wispy bits? I was going for those christmas-tree-type spiky leaves. I think I failed miserably here :( |
 |
| The two placemats I did: and we'll be eating off them - on plates, of course! - tonight, and all through the Christmas season. They are really very easy to look after: just pop them in the washer, and then the dryer, and they're clean again, and good to go! |
 |
| My doodly pig!!! Chuan gave me this pig, with paints, a lonnnnnnng, lonnnnng time ago, for Christmas. I never got round to painting it, poor thing. Yesterday, when I wanted to - the paints were all hard as stone. Surprise! Surprise! |
 |
| A view of its other side ;) |
 |
| And there it is, sitting pretty on a dresser :) |
 |
| Just finished :) |
 |
| We must have a close up, to show that I've yet to master my curly-cues. Sigh. |
 |
| And now, weighed down with all the stuff I need for my face, and then some ;) |

 |
| Just finished, but not yet top-coated - on my untidy desk! |
 |
| Not my best picture, eh - taken with the flash off, and in the room light. |
 |
| The bin, all ready to be used: with a liner fitted, and sitting next to the girls water bowl :) |


 |
| I'm keeping this one small, because it is the only one I have, but it's so blur. Sigh. It's the 'before' shot, yennyways, and they always look like this :( That's TOFFEE, btw |
 |
| Two shots of it - above and below - with my other two girls: Jolie and Bella. It's dry and ready to be sat on :) |
 |
| And the close-up, warts and all . . . . I painted this is ordinary acrylic paint. I didn't bother with the fabric medium because, I felt, this didn't need to feel soft. For the same reason, I didn't rush out and get fabric paint. When I'd finished, I let it dry over night, and when it was completely dry, I put it in the dryer to set. It could've been ironed on the wrong side to 'set' as well - but the dryer is the easier option for me. It will wash normally, and be just fine. I know. Because I have a tee-shirt blouse that I painted months ago, and it's still bright and chirpy after many, many washing-machine washes, and drying in the dryer. Fabric painting is different, and the techniques I needed to use were also different. So, I did enjoy doing this piece :) |