Sunday 28 August 2011

Absolute hydrangea

My blue hydrangea, on an Absolute - vodka - bottle - as usual, taken from a few angles, and sitting with its friends on my shelf.


Saturday 27 August 2011

Doodlies!

I find that I am doing at least one of these every day! So far, I have a collection of five:

3" x 4"

5" x  4"

6" x 2.5"


4.5" x 2"

4" x 3"

Friday 26 August 2011

Johnny Walker makeover

Yes, Johnny got a makeover: in black. With yellow roses, and little flowers on the other three sides.

Here are the pix to prove it:

The half-litre JW on my kitchen table

Little flowers on the other sides


Close-ups of the top,  
... front ...
... and bottom.


Thursday 25 August 2011

The calla lily and a basket of daisies

I have been trying to figure out how to paint this flower - which I love - and here is someone who figured out how for me!


Plus, a lovely surprise for me to find this one today - Ros Stallcup painting daisies:


Monday 22 August 2011

Doodle-y bottles

These are soy-sauce bottles, that have been given the doodle treatment:


Sunday 21 August 2011

I'm into doodling :)

Ever since I discovered Miraculous Mosquito on You Tube, and went to visit her blog, I have been obsessed with doodling. I find it infinitely riveting to do, and whenever I feel like it, I will pick up a pen and ... well, just doodle.

I found so many videos online of people doodling, including one of drawing mandalas, and other interesting doodles. I started out my first doodles in French class, while waiting for the teacher to materialise, and did them in ballpoint pen. That wasn't really fun, because the pen was less-than-wonderful.

So, the next doodles were all done with felt-tips, and here are some of them:


This is a mandala, that you grow from a seed,
right in the middle. 


And these next three are done with my new pen, that Chuan bought for me yesterday :)


Saturday 20 August 2011

Lacey doily - update

Here's the picture I promised, of the doily sitting pretty in my living room:

There it is, next to my two-seater

I don't really know if the colour can be seen, but it should look ivory-ish/off-white
Before I fitted the glass back into the table, I protected the painting with two layers of topcoat. I used an antique-coloured topcoat, so that the doily isn't TOO white, which is a tad in-your-face, I think. Now, after the double layer of topcoat, it has an off-white, ivory finish, which I love. It also goes well with the brown of the glass. Since I cannot bake the doily, it will have to cure here for 21 days, and then it should be fairly ruin-proof ;)


Tuesday 16 August 2011

Lacey doily

Today, I finished a really big project :)

It's really big for me, because it involves something for my living room, and because it will sit there, and be seen by anyone or everyone who visits, I was (still am!) a tad nervous about it.

But, it is something I had planned to do for a long time, and yesterday was the day to do it!

'It' happens to be the glass-top of a side-table in my living room. It is an old side-table, and actually is part of a set that my mother gave me when she moved out of her home, and into mine.

So, here is how I did it, and the finished project is right at the very end:

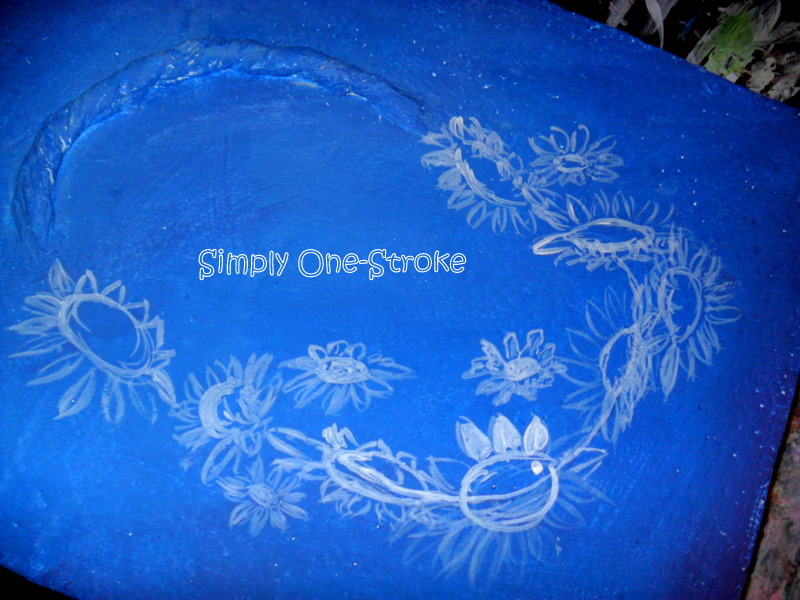
First, I did a rough sketch of how I'd wanted the doily to look - but in the end
you'll see that I sorta changed it. A lot ;)

Then, I made this template to stick under the glass. Lace cannot be worked
free-hand - at least not for me :(

Half done! I first painted in the 'linen'; then, I put in the large comma strokes.

Finished at last: with the line-detail filled in with a liner-brush; then the dotting
- which I think brings the whole thingy nicely together!

Detail of the design: for anyone
who'd like to try it :)

This looks complicated and tricky, but all it takes is patience and a steady mind focused on the project. It's very therapeutic and relaxing. Painting meditation, if you ask me :)

(When it has dried, and been top-coated, I'll fit it back onto its table - and then, I'll update this with a picture of my project - sitting in the living room!)


Thursday 11 August 2011

I can do pastels, too

My last piece was too, too blue - and so, as an antidote, I did this one:


Note to self:

I was going for the watercolour effect for the background. It took me a while to get it - so that's why it's patchy. I need to dilute the paint, and do the whole piece wet-ly, and only after that, go over it again, to deepen the shade. Try and try and try again.

Something for Sherrie (updated)

I did a little bit of work this morning, and with my angle-brush, added a little bit of shading to the the petals, and to generally bring the piece out a bit. It's not very much, but to me, it makes it less flat.

I floated burnt umber - just a touch - along where I felt the shadows would fall, taking my cue from the natural shadow underneath my gold-dabbed arc.


... without ...

... with shading.


Wednesday 10 August 2011

Something for Sherrie

I painted this piece for my French friend, Sherrie ;)

This time, I had the camera out - I was taking pix of my dogs - so, I have a few pictures of the stages of my work:

The background, in blue, with a bit of burgundy at the edges. Nope,
I cannot just have a plain blue anything. Btw, there were
some holes, so I covered them up with a bit of tissue,
to look like a bit of moulding (like that found on doors, etc.)

My sketch of what I want to paint, done in white.

Then, I painted the flowers in with white, so that the colours would look
stronger on the blue of the background.

A pix of the finished piece. The moulding looks kinda nuts to me. And
I sure could use some more practice with my sunflowers.
(Taken with a flash.)

Sunflowers, daisies, and blue rose-buds.
Taken without a flash, in natural light.
This is an earring holder. You stick your earring-studs into them, and they are all there, arranged in front of you, so you don't need to sort through them every time you want a pair! Because it is so light, it can be mounted with double-sided tape. Mine is, and it's staying up just fine :)

It is made from an old piece of polystyrene (styrofoam), which is quite hard to come by these days, because of the use of a kind of papier-mache cardboardy thingy that is now in use. More eco-friendly, and biodegradable, too.

So my days of painting on styofoam are numbered! I'm not complaining, though. It EATS paint!!! :(